
Dyeing black shoes is a simple and effective way to give your old footwear a brand-new look or to customize them to suit your style. Whether you’re refreshing a faded pair of shoes or changing their appearance entirely, the process is straightforward with the right materials and technique.

This guide on how to dye black shoes will walk you through the steps to ensure professional-looking results, helping you bring your creative vision to life.
Materials Needed
Black Dye
You can choose from a variety of black dyes, including synthetic, natural, or leather-specific options. Choose the type of dye based on the material of your shoes for best results.
Hot Water
A large pot to boil water is necessary for submerging the shoes during the dyeing process.
Gloves
Protect your hands from stains by wearing rubber gloves throughout the process.
Old Towels or Newspapers
Place old towels or newspapers in your work area to avoid staining any surfaces with dye.
Sponge or Brush
A sponge or a brush can be used to apply the dye on your shoes, depending on the type of material.
Salt (Optional)
Some dyes may require salt as an additional ingredient. Check the instructions on your chosen dye before starting.
8 Step-by-step Guidelines on How to Dye Black Shoes
Step 1: Prepare Your Shoes
Before starting the dyeing process, it’s important to prepare your shoes properly to ensure the dye adheres evenly. Begin by cleaning the shoes thoroughly with soap and water to remove any dirt, grease, or oils. For shoes made of leather or similar materials, consider using a leather cleaner or rubbing alcohol for deeper cleaning.

Allow the shoes to dry completely. If your shoes have any laces, remove them before dyeing to avoid uneven coloring. Additionally, cover any areas you do not want dyed, such as soles or logos, with painter’s tape. Proper preparation is key to achieving a smooth, professional finish.
Step 2: Protect Your Work Area
To avoid making a mess during the dyeing process, ensure your work area is well-protected. Lay down old towels, newspapers, or a plastic sheet to cover your workspace and catch any spills or splatter. This step is particularly important if you’re working indoors or on a surface that could be stained by the dye.
Make sure the area is well-ventilated to allow fumes from the dye to dissipate. Taking the time to prepare your workspace will save you from unnecessary cleanup and help keep the process organized and stress-free.
Step 3: Mix the Dye
Follow the instructions on your chosen dye to prepare it for use. This may involve mixing it with hot water and salt, depending on the type of dye you’ve chosen.
Once mixed, transfer the dye into a container that is large enough to hold your shoes comfortably without spilling over. A plastic bin or bucket works well for this purpose.
Step 4: Dip Your Shoes
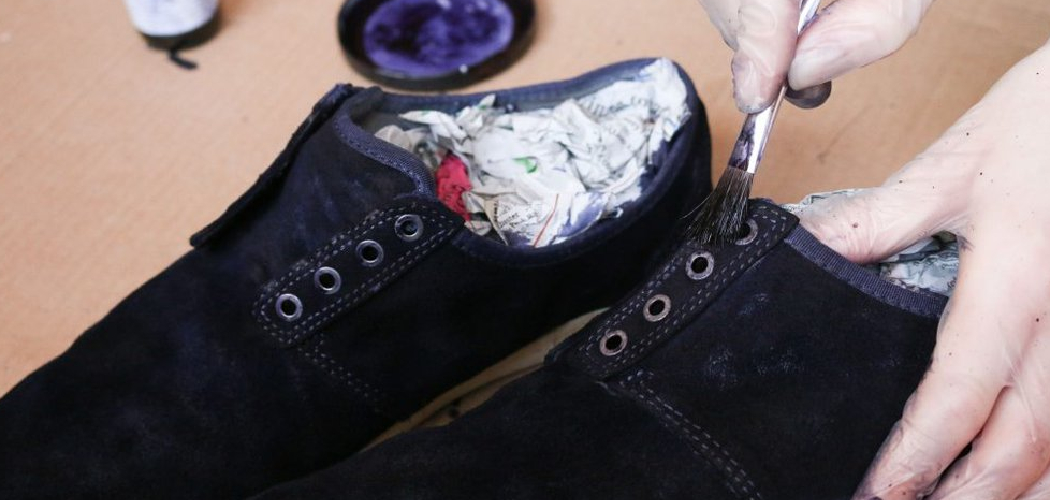
Carefully submerge your shoes into the prepared dye solution, ensuring they are fully covered for an even application. Use gloves to handle the shoes and gently swirl or move them around in the dye bath to prevent any patchy spots or streaks. Allow the shoes to soak as per the dye manufacturer’s recommended time, which is typically between 30 minutes to an hour, depending on the material and the desired intensity of the color.
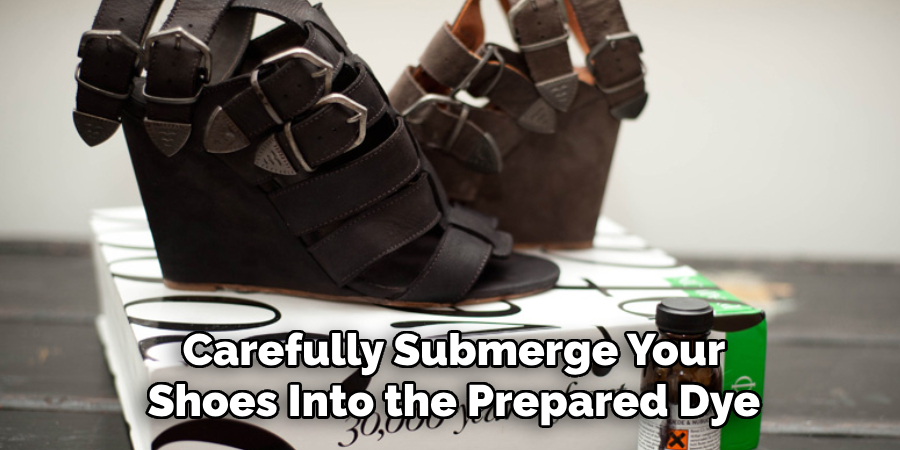
For shoes made of absorbent materials, like canvas, you may need to periodically check and adjust their position to ensure thorough dye penetration. If you’re working with leather or other non-absorbent materials, you may need to use a brush or sponge to apply the dye instead of submerging them.
Step 5: Rinse and Dry
After allowing the shoes to soak in the dye, remove them from the solution and rinse them under cold running water until all excess dye has been removed. Be sure to clean off any remaining dye from your gloves as well.
Allow the shoes to dry completely before handling them. You can either air-dry them or use a blow dryer on low heat for faster drying. Once dry, inspect your shoes for any areas that may need an additional coat of dye for more intense color.
Step 6: Repeat Dyeing Process (Optional)
If you’re satisfied with the color of your shoes after the first dyeing process, skip this step. However, if you want a darker or more vibrant color, you can repeat the dyeing process by following steps 4 and 5 again. Be mindful not to leave your shoes in the dye for too long as it may result in an uneven or over-saturated color.
It’s also important to note that each time you dye your shoes, the color will intensify. Therefore, if you’re not careful, you may end up with a much darker shade than intended.
Step 7: Remove Painter’s Tape and Reattach Laces
Once your shoes are completely dry, carefully remove the painter’s tape from any areas that were covered. This step helps reveal any clean lines or patterns left behind by the tape and gives your shoes a more polished look.
If you removed the laces before dyeing, now is the time to reattach them. You can either use the same laces or switch them out for a new pair to complement the newly dyed color.
Step 8: Seal the Color (Optional)
To ensure the longevity of your newly dyed shoes, consider sealing the color with a protective spray or finisher. This will help prevent the dye from fading and bleeding over time. Follow the instructions for your chosen product for the best results.
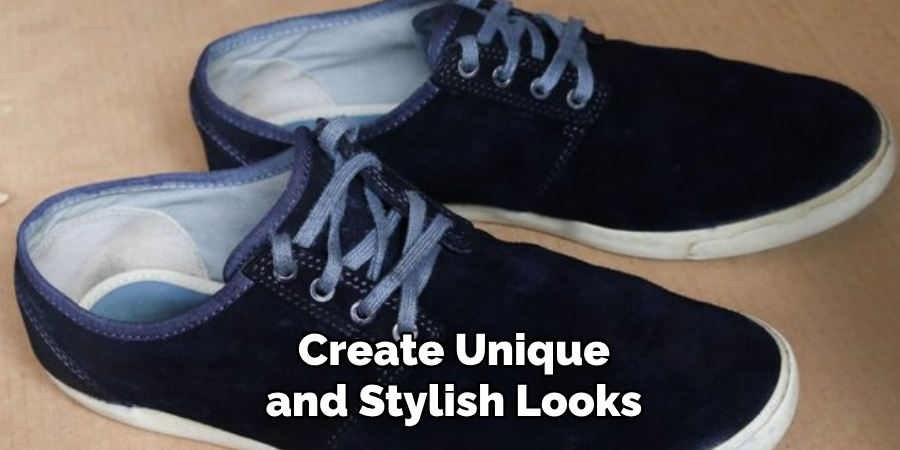
Following these step-by-step guidelines on how to dye black shoes will help you achieve a professional-looking dye job on your black shoes. With just a few materials and some patience, you can give new life to old, faded or mismatched footwear and create unique and stylish looks that reflect your personal style. So, get creative with your shoe colors and have fun experimenting with different dyeing techniques and effects. Happy dyeing!
Care and Maintenance
Proper care and maintenance are essential to keep your dyed shoes looking vibrant and fresh. Here are a few tips to help prolong the life of your newly dyed shoes:
- Avoid getting your shoes wet for at least 2-3 days after dyeing to allow the color to fully set and prevent bleeding.
- Use a soft cloth or sponge to clean your shoes instead of abrasive materials that may scratch or damage the dye.
- If possible, avoid exposing your dyed shoes to direct sunlight for extended periods as it can cause fading over time.
- When storing your shoes, keep them in a cool, dry place away from direct sunlight.
Following these tips will help maintain the color and quality of your dyed shoes for longer. Consider re-dyeing periodically as needed to refresh the color and keep your shoes looking like new. Happy styling!
Frequently Asked Questions
Q: Can I Dye Any Type of Shoe?
A: Yes, you can dye almost any type of shoe as long as it is made of a material that can absorb dye or can be painted over. It’s important to note that the results may vary depending on the type of material and brand of dye used.
Q: Can I Remove Dye from My Shoes If I’m Not Happy with the Results?
A: Removing dye from shoes can be a difficult and time-consuming process, especially if it has already been absorbed into the material. It’s best to test a small area before fully dyeing your shoes to ensure you’re happy with the color. If you do want to remove dye, try using a color remover or bleach specifically designed for fabrics or consult a professional shoemaker.
Q: How Do I Prevent Dye From Staining My Skin?
A: To avoid skin staining, always wear gloves when handling the dye and make sure to wash your hands thoroughly after completing the dyeing process. If you do get some dye on your skin, try using a mild soap or nail polish remover to remove it before it sets in.
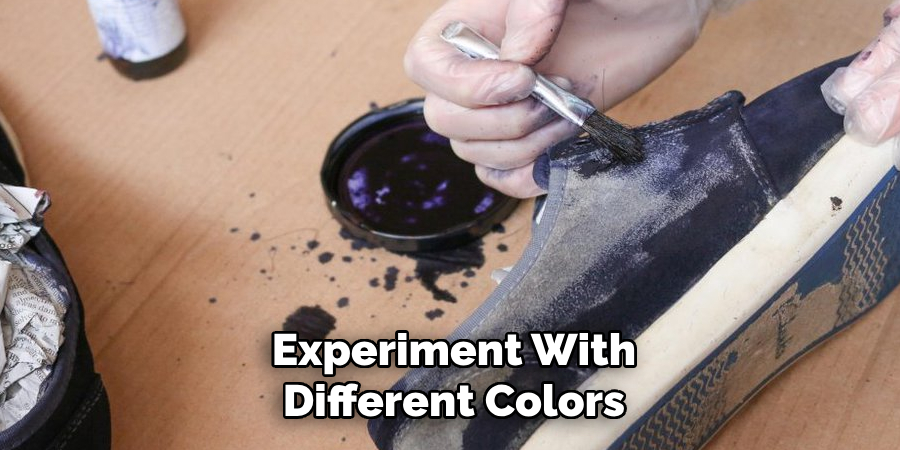
Q: Can I Dye My Shoes Different Colors?
A: Yes, you can experiment with different colors and create unique effects by dipping or painting your shoes in different areas with different dyes. Just be mindful of how long you leave the shoes in the dye to avoid over-saturation.
Q: How Long Will the Color Last on My Dyed Shoes?
A: The longevity of the color on your dyed shoes can vary depending on the material and dye used. To ensure the color lasts longer, try using a protective spray or finisher after dyeing and avoid exposing your shoes to harsh elements. Remember to also follow care instructions specific to the type of material of your shoes for best results.
Conclusion
Dyeing black shoes is a fun and creative way to transform your old pair into something new and unique. With the right materials and technique, you can achieve professional-looking results at home without spending a fortune on new shoes.
Remember to always prepare your shoes properly before dyeing, protect your work area, mix the dye according to instructions, and take your time to ensure an even application. And don’t be afraid to experiment with different colors and effects for a truly personalized look. Thanks for reading this article on how to dye black shoes. Happy dyeing!