
Changing a shower arm is a straightforward task that can significantly improve the appearance and functionality of your shower. Whether you’re upgrading to a new design or replacing a worn-out fixture, this DIY project requires minimal tools and can be completed in just a few simple steps. With the right guidance on how to change a shower arm, you’ll have a new shower arm installed in no time.
What is a Shower Arm and Its Function?
A shower arm is a pipe that connects your showerhead to the water supply coming from the wall. Typically made of metal, it serves as both a functional and aesthetic component of your shower setup. The shower arm’s primary function is to direct water from the plumbing system to the showerhead, ensuring a consistent flow.
Additionally, its design and length can affect the positioning of the showerhead, influencing how water is distributed during a shower. Choosing the right shower arm can enhance both the visual appeal and usability of your bathroom.
Common Reasons for Replacing a Shower Arm
There are several reasons why homeowners may choose to replace a shower arm. Over time, shower arms can become corroded or rusted due to constant exposure to water and moisture, leading to both aesthetic and functional issues. Another common reason is upgrading the style or design of the shower to match modern fixtures or enhance the overall bathroom appearance.
Additionally, if water flow issues arise, such as leaks or poor pressure, it might indicate that the existing shower arm needs replacing. Sometimes, replacing the shower arm is necessary to accommodate a new showerhead or to adjust the height for better convenience. Whatever the reason, swapping out the shower arm can quickly restore or improve the shower’s performance and look.
10 Methods on How to Change a Shower Arm Like a Pro
Changing a shower arm is one of those tasks that sounds more complicated than it actually is. Over time, shower arms can develop rust, leaks, or just look outdated. Luckily, with a few tools and a bit of know-how, swapping it out can be a simple DIY project. Follow these 10 methods to safely and effectively change your shower arm and refresh your bathroom in no time.

Before we get started, make sure you have the necessary tools, like a wrench, plumber’s tape, and possibly a ladder if your shower setup is elevated.
1. Turn Off the Water Supply
While the shower arm itself won’t spray water when removed, it’s always a good idea to turn off the main water supply as a precaution. This ensures you avoid any unintended leaks or messes. To find the main shut-off valve, check areas like your basement or utility room.
2. Remove the Old Showerhead
Before replacing the shower arm, you’ll need to take off the showerhead. Hold the shower arm steady and unscrew the showerhead counterclockwise using your hands or an adjustable wrench if it’s stuck. Be sure to place the removed showerhead somewhere safe if you plan on reusing it.
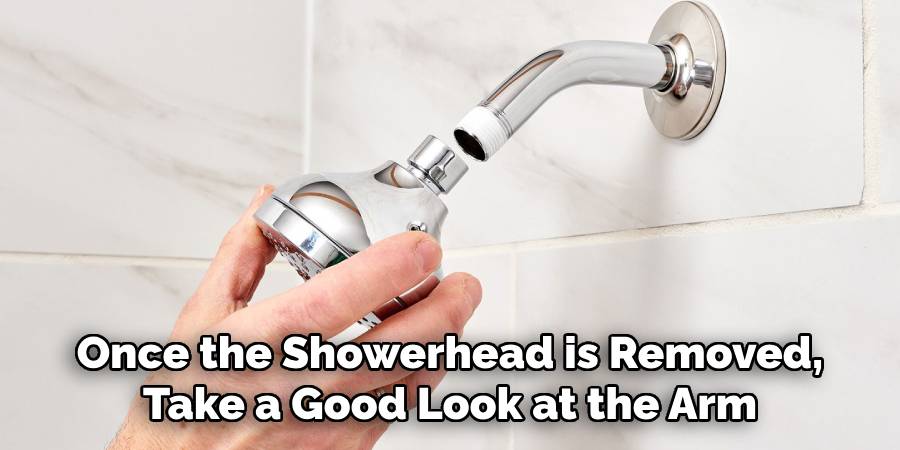
3. Inspect for Rust or Damage
Once the showerhead is removed, take a good look at the arm and surrounding pipe for rust, mineral build-up, or other signs of wear and tear. If the damage extends beyond the arm, you may need to assess the pipework behind the wall.
4. Use a Pipe Wrench to Remove the Arm
To detach your old shower arm, place a pipe wrench or adjustable wrench around the arm, then turn it counterclockwise. If it resists, don’t panic—this is common. Apply gentle pressure to avoid damaging the threads inside the wall.
5. Clean the Threaded Connection
With the old arm removed, clean the exposed threaded connection thoroughly. Use a soft brush or sponge to clear away any rust, mineral deposits, or debris. A clean connection ensures a tighter seal for the new shower arm.
6. Wrap Pipe Threads with Plumber’s Tape
One of the most important steps in the process, applying plumber’s tape helps create a watertight seal and prevents future leaks. Wrap the tape around the threads of the new shower arm in a clockwise direction. A small layer (2–3 wraps) is enough to do the job.
7. Install the New Shower Arm
Carefully screw the new shower arm into the threaded connection by hand. Turn it clockwise to tighten. Once it feels secure, use your wrench to give it a few additional turns—just be careful not to over-tighten, as this could damage the threads.
8. Attach the Showerhead
Once the shower arm is firmly in place, reattach the showerhead to the other end of the arm. Again, use plumber’s tape on the showerhead’s threads for an added level of security against leaks. Tighten the showerhead with your hands or a wrench, being careful not to scratch or damage it.
9. Test for Leaks
Turn your water supply back on and test the shower. Run the water for a few minutes and closely inspect the arm connections for any signs of leaking. If you notice water dripping, tighten the connections slightly or reapply plumber’s tape if necessary.
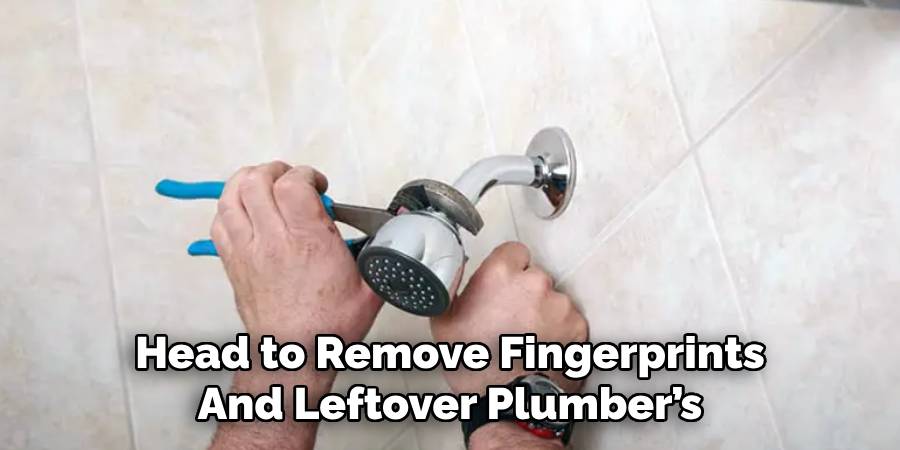
10. Add Finishing Touches
With everything securely in place and functioning properly, you can clean up the area and admire your work! Wipe down the shower arm and head to remove fingerprints and leftover plumber’s tape, leaving your bathroom looking fresh and polished.
Maintenance and Upkeep
To ensure your new shower arm remains in excellent condition, regular maintenance is essential. Start by cleaning the shower arm and showerhead monthly to remove mineral deposits or soap scum that can accumulate over time. A solution of vinegar and water can effectively dissolve hard water buildup—simply soak a cloth in the mixture and wrap it around the shower arm and head for 20–30 minutes before rinsing.
Inspect the connections periodically to check for any signs of leaks or loosening. If you notice water dripping from the threads, reapply plumber’s tape and tighten the fittings as needed. Additionally, avoid using abrasive cleaning tools or harsh chemical cleaners, which can scratch or corrode the metal surface.
For homes with hard water, installing a water softener is a great long-term solution to minimize mineral buildup on the shower arm and inside the showerhead. Regular upkeep will not only keep your shower looking great but also maintain optimal water flow and extend the life of your fixtures.
Troubleshooting Common Issues
Even with proper installation and maintenance, you may encounter issues with your shower arm or its components over time. Here are some common problems and how to address them effectively:
1. Leaking Connections
If you notice water dripping from the connection points of the shower arm, it’s likely due to loose threads or an inadequate seal. To fix this, turn off the water supply and unscrew the leaking connection. Clean the threads thoroughly, reapply plumber’s tape, and securely reattach the shower arm or showerhead. Ensure all connections are tight but avoid over-tightening, as this can damage the threads.
2. Low Water Pressure
Low water pressure can be caused by mineral deposits clogging the showerhead or the arm itself. To resolve this, remove the showerhead and clean it thoroughly, soaking it in a vinegar and water solution to dissolve any buildup. If the issue persists, clean the inside of the shower arm using a flexible brush or replace it entirely if it’s heavily clogged.
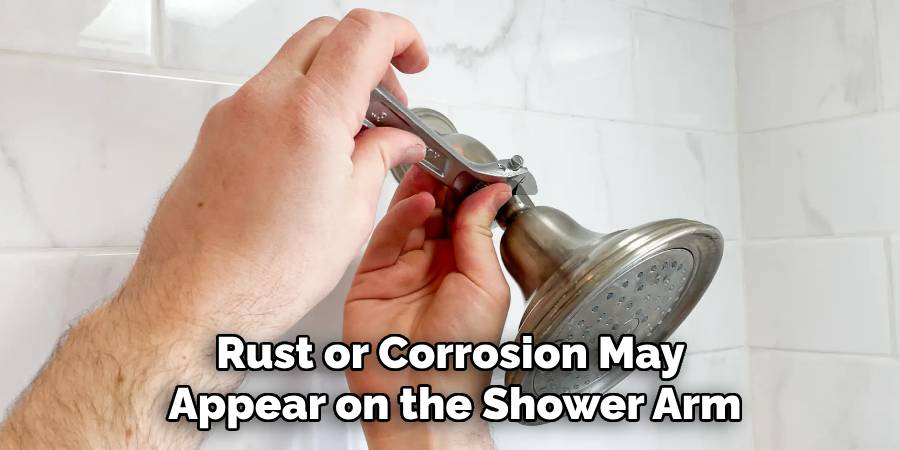
3. Rust or Corrosion on the Shower Arm
Over time, rust or corrosion may appear on the shower arm, especially in high-humidity environments. If rust is minimal, you can clean it using a soft cloth and a mixture of baking soda and water. For more severe cases, replacing the shower arm may be necessary to ensure optimal performance and avoid leaks caused by structural deterioration.
4. Unstable Shower Arm
If the shower arm feels loose or wobbles, it may not be securely attached to the pipe. Carefully remove the arm and inspect the wall connection. Tighten the shower arm or replace the wall fitting if it shows signs of wear or damage. Using thread sealant or extra plumber’s tape can also help secure the connection.
5. Water Dripping After Turning Off the Shower
If water continues to drip even after the shower is shut off, the issue may not be with the shower arm but rather with the shower valve. Inspect the valve and cartridge for wear, and replace them if necessary. This may require shutting off the main water supply and consulting a professional if you’re unfamiliar with valve repairs.
Addressing these common issues promptly ensures your shower arm and fixtures remain functional and efficient, reducing the likelihood of more significant plumbing problems in the future.
Conclusion
Installing and maintaining a shower arm may seem like a small task, but it plays an important role in ensuring the functionality and longevity of your bathroom fixtures. By following the step-by-step installation guide, performing regular maintenance, and addressing common issues as they arise, you can enjoy a reliable and leak-free showering experience for years to come.
Whether you’re upgrading your bathroom or simply replacing a faulty component, attention to detail and proper care will save time, money, and potentially prevent more significant plumbing problems. Thanks for reading our blog post on how to change a shower arm! We hope you found it helpful and informative.

